
Do you have a lifetime collection of photos of YOUR family? Or maybe you have inherited an even older collection of family photos for previous generations of your family? It’s more than likely that some of them are starting to show their age, and some others just won’t have been taken care of the way they should have been. In some cases bulk photo restoration is unavoidable, but even if you don’t think it’s needed right now, if you let them deteriorate even further it could mean an expensive bulk photo restoration project, costing you a small fortune to get them all repaired and restored.
As we progress further and further into the digital era and leave (for most of us) film photography farther and farther behind, these collections of printed photos become an even more precious link to the past and to the lives of our grandparents and great grandparents. Unless you take the time and effort to scan photo collections, or get help to do it, then there is no Cloud backup if your photos eventually crumble away.
Here are our top 8 tips to looking after your photographs to keep them looking their best until you decide on some other course of action, and avoid the hefty costs that bulk photo restoration brings.
Let’s start with environmental conditions:
1. Temperature
Large temperature fluctuations should be avoided, as this can cause cracking, so most garages or un-insulated lofts should be avoided, as they will be hot in the summer and cold in the winter. For
the same reason, photos should be kept away from radiators
The lower the temperature, typically, the better, because this slows down degradation of the paper and ink, and also discourages insects.
Try to store your photos in an area that consistently stays below 75F / 24C at all times.
2. Humidity
In extremely dry environments photo paper can become quite brittle. But normally the issue is making sure you don’t keep the photos in an area with too high humidity. Don’t keep your photos stored in a damp basement, for example, as it encourages mould growth and can also cause the pictures to stick to each other as they get moist and the ink and pigments run and fade. Higher humidity also can cause more insect infestations of paper, which can destroy your photos.
3. Light
Storing photos in a dark location actually helps preserve them, because it keeps the ink or pigments from fading. Light in general, but especially UV and fluorescent lights, break down images with time. If you’ve ever removed a photo that’s been on display in a frame for years you’ll be familiar with the vibrant colours around the edges of the photograph, that have been protected from the direct sunlight by the mount and frame. So as much as possible, keep your photographs out of direct sunlight.
TIP #1 If you’ve got a favourite precious photo you’d like to display (and who doesn’t?) make a copy first (either a re-print or a digital copy), and keep the original print in a safer darker environment so that you can enjoy the memory the photo provides on display, and at the same time preserving a copy for the future.
4. Water
In the UK we have a very temperate climate, rain is always just around the corner, and flooding is sadly becoming a more and more frequent topic on the news. If rivers near you have been known to burst their banks, or recently have been getting closer and closer to it, then common sense says you shouldn’t store your priceless photos at low levels on the ground floor. Also keep your photos away from underneath water pipes – they can leak, and they can burst in winter time. Carpets and furniture can be replaced, photos not so much.
Now let’s move on to handling and storing:
5. When handling your photos (and also negatives) you should have clean dry non-lotioned hands. Always hold photos and negatives by the edge, and never put your fingers directly onto them. Your fingerprints contain oils and other chemicals that can permanently leave a mark on the photos or negatives.
6. Kids with sticky fingers and/or pens and precious photographs DON’T MIX. The number of times we’ve been asked to remove felt tip pen marks from photos, or repair photos that the baby has torn in half, would make you shiver!
TIP #2 If you MUST give the kids free access to your photographs, make sure you get the photos scanned first. When was the last time you saw some strawberry jam somewhere it shouldn’t have been on a digital image?
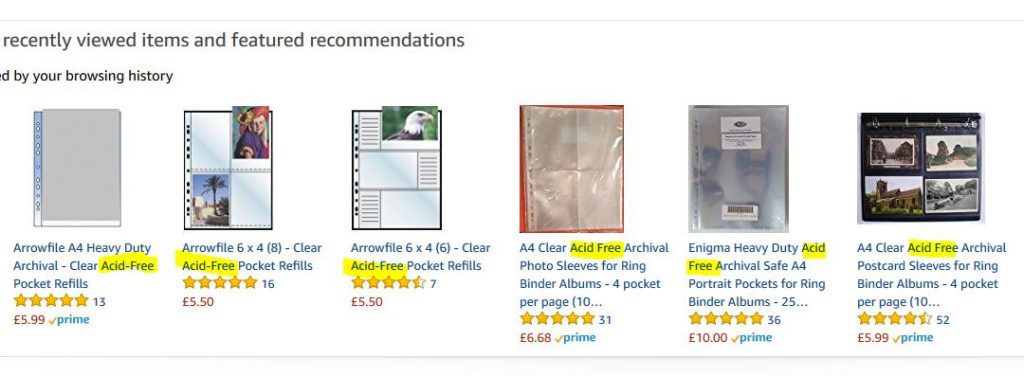
7. Pay attention to the photo albums, and paper and plastic storage products that you plan to use. Many aren’t specifically made for storing photos and some regular envelopes, ziplog bags, and other things commonly used for photo storage aren’t always safe for your photos. We now know that many of these things actually harm your pictures, such as non-archival quality papers which contain lignin and other acids, or adhesives which become yellow and brittle with age, and plastics that degrade and cause the photo to stick, sometimes permanently, to the album. Only use lignin free, acid free, un-buffered paper for storing photographs or as interleaving paper in albums and only use PVC-free plastics such as Polyester, Mylar, Polypropylene, Polyethelyne and Tyvek.
So steps 1-7 are guides to handling and storing your printed photo collections. If this is too old-school for you, and you only have a digital collection of photos, then this last tip is for you.
How many years have you been collecting and storing digital images now? Do you take them on your phone or with your camera? How many different folders on your computer do you have them in? If you needed to – could you find the photos of your mum’s 50th birthday party, or 3 Christmases ago? I have one folder on my computer that has 274 photos in it (and I know that is small fry compared to most!). The files are named P1000001 through P1000274 – no clue to what any of the photos are about. If you are more trigger happy with your photography (do you take photos of your breakfast?) then you are more likely to have a gazillion photos or more! How long do you think it would take you to preview all your images to find the right one? If you can’t locate any specific photo when you want or need to, then what’s the point?
8. Give your photos a name, or tag them with relevant info so that you can search for them.
We recommend starting every name with the date e.g. “2016-12-25 Emma 1st xmas”, as this means your operating system will always list related images together. Always use 2 digits for the month and 2 digits for the day, and use xx’s if you don’t know specific details of the date. Here are some great additional guidelines for naming files.
TIP #3 To rename multiple photos at the same time
1. Open the folder and select View > Thumbnails
2. Click the first picture you want to rename, hold down the shift key, and click the last picture you want to rename. this selects all the pictures at the same time.
3. Right-click the first photo, and choose Rename from the drop-down menu.
4. The existing filename of the photo will be shown – rename it giving it a helpful descriptive name (eg. 2017-08-05 mums 50th)
5. Just click outside the photo and Windows will rename all the selected photos with the same name plus a numeric suffix (2017-08-05 mums 50th (1), 2017-08-05 mums 50th (2), 2017-08-05 mums 50th (3) etc)
(For the images you have already printed and have proudly on display in your home, why not copy the file to a separate folder called something like “My printed photos” and rename it to something useful, in case you ever need to reprint it, or if a family member asks for a copy.)
The long term goal should be to scan photo collections as soon as possible and/or affordable to stop any further deterioration. Depending on how many photos you have this CAN still amount to some serious cash, but you CAN do it yourself with a more moderate investment. But what price do you place on YOUR family history? Then after a review of your collection at your leisure you can decide which photos are important enough to you to want to have them restored to their former glory.
If that is still a considerable number then the cost might still seem prohibitive, but it’s best to prioritise, and break down your project to manageable chunks. If you stick to the storage and handling guidelines above then hopefully further deterioration is kept to a minimum. To help keep the cost down Caledonian Digital also offer a bulk photo restoration scheme over 3, 6 or 12 months, which saves you 50% on all photo restoration work so you can spread out the bulk photo restoration project costs over a suitable length of time (which can save you a massive £2000 over a 12 month period!) so that is definitely worth checking out!